Showing posts with label DIY. Show all posts

Monday, October 13, 2014

Ninja Mask Tutorial


For Will's Ninjago birthday party last week, I made some really simple ninja masks for all of the kids.  Once I had the measurements and pattern created, they only took about 10 minutes to make.  So, I thought I'd share a tutorial in case anyone out there is looking for a ninja Halloween costume or wants to make it for a ninja or Ninjago party.  These masks fit all of the kids at our party, whose ages ranged from 2-8.  This is largely due to the type of fabric I chose to use, which was a stretchy, two-way stretch knit, nylon I think, like you would find in dance costumes.  And because it is a knit fabric, I didn't even need to finish any of the edges, making it that much more simple!  All this pattern takes is one seam and it's done!

Here's what you need:
-Two-way stretch knit fabric (cotton, nylon, or spandex types will work best)
-Matching thread
-Scissors
-Sewing machine

Take your fabric and fold it in half (in case your fabric only has a 1-way stretch, make sure that the biggest stretch is stretching horizontally so that it can be stretched over the child's head).  Place your pattern on the fabric, lining the side along the fold.  

My pattern is 14" from the highest point on the top of the head to the bottom, 10" across the bottom under the eye hole, from the edge to the eye hole is 7", and the height of the eye hole is about 1/2".  Cut out your fabric, making sure to not cut the section labeled "fold", under the eye hole.  Cut from above the eye hole, all the way around the rest of the pattern.  Once your fabric is cut out, it should all be one piece, connected under the eye hole.  

Put right sides together and sew the edges together (I just used a zig zag stitch and a regular needle) from the bottom around to the top of the eye hole and you're finished!  Turn it right side out and try it on your little ninja!


Saturday, April 19, 2014

Clara's Minnie Mouse Birthday Party

Last week our little Clarabelle turned two years old!  I can't really believe she's two though; she just still seems like my baby!  And now that we have Bennett, I just feel like I have a big baby and a little baby!  But, as challenging as some days can be with this little spitfire of a girl, I sure do love her!  She can be so so sweet, she loves to help, and she is very affectionate--always wanting to cuddle or give hugs or be held and I really love that about her.


Right now, she's also very into Minnie Mouse and all things pink, so it only seemed fitting that we would have a Minnie birthday party for her.  But since I'm somewhat still in survival/adjustment mode with the addition of Bennett to our family and since Clara is only 2, and she hasn't really hit the stage of having friends that she actually plays/interacts with (other than knowing and recognizing them), I knew that I wanted to keep her party pretty simple and low-key.  So, in order to save ourselves from the stress of  hosting the party at our house, we decided to have it at one of our favorite places, Kiddie Park (you can read more about what we love about Kiddie Park in my Kickin'it in SA post here).


Having her party at Kiddie Park meant we really didn't have to do much at all by way of decorations, which is just the way this mama wanted it :)  And, we also decided to go really simple with the food since the kids really only care about riding the rides anyway!  We made a double layered strawberry cake (because it's pink!) with regular vanilla buttercream frosting that we made pink with food coloring and just placed the circles together to look like Minnie's head.  This is also where we simplified things--instead of having to rely on our artistic abilities to draw Minnie's face (and make black frosting, which I hate doing)--we just made a pink Minnie-shaped head.  And I personally think it's just as cute!  Then I googled "Minnie Mouse bow" and found an image I liked, printed it on card stock and just set it on the cake.  And voila!  A super easy Minnie Mouse cake!  We also made some extra marshmallowy, extra gooey rice krispie treats with pink sprinkles on top, but I forgot to get a picture.

For the plates, I just bought small and large black paper plates and stapled two small ones to each big one so they looked like ears.  Then I printed off more Minnie bows and taped them to the plates.  Add some mini (pun intended :)) water bottles with Minnie Mouse straws that we scored at the dollar store, and that was it for both the food and decorations!  The kids loved it and it wasn't much work at all for us.  Win-win.


While gathering our supplies at the dollar store, we found Mickey and Minnie Pez dispensers.  And with that, we had party favors!  We were originally going to make Minnie/Mickey ears for all the kids (most of Clara's guests were actually Will's friends, thus we needed Mickey for all the boys) out of card stock, but while wandering through the party aisles at Target, we came across these cute Minnie headbands!  Score.  Saved us some major time, but at $3 a pop, we decided not to get them for all 12 kids that were at the party and instead just got them for the girls and Will of course.  Bennett borrowed Will's for the picture.  Isn't he the cutest little sleeping Mickey???


I think my spunky little girl had a fun day!  And we had tons of fun celebrating with her.  Even Benny woke up and gave us a rare smile for our family picture (of course Clara isn't looking . . . but at least she doesn't look grumpy!)!  Happy birthday Clara-bee!


Thursday, April 3, 2014

DIY Lemon Sugar Scrub


Lately, I've been feeling like my skin needs a little rejuvenating!  (Let's be honest, I'm 3 weeks postpartum--my whole body/mind/soul needs rejuvenating!)  Making a sugar scrub has been on my to-do list for months actually, and I'm finally getting around to it!  I don't really know why it's taken me so long to get done, it literally takes 5 minutes to whip up!  I think I always forget about it until I'm in the shower or rushing to get ready and am not able to do it in that moment. Anyway, enough about me and my reasons for procrastinating . . . The reason I chose to make a lemon scrub is because the scent is so refreshing!  And when mixed with sugar and coconut oil, it seriously smells like lemon cream pies and I just can't get enough of it!  Want to make your own rejuvenating lemon sugar scrub???  Here's what you'll need:

- A glass jar/container that can be sealed shut
- 2 Cups Granulated Sugar
- 1/4 Cup Coconut Oil
- Lemon Essential Oil (you can get some here, or you can use lemon juice)

If needed, melt your coconut oil first so that it's in liquid form.  Mix the coconut oil and sugar together.  If it's still too wet, add more sugar until the consistency is thick and not too oily.  Next, add one drop of lemon oil at a time to the mixture until the scent is as strong as you'd like it.  Store in an air tight container and start pampering yourself!


* Adding to my post about lemon oil, this is another great way to use lemon oil on a daily basis!
** Lemon oil is a great astringent and it also helps to brighten skin.  It also aids in circulation and the aroma can help to lift your mood.

PRECAUTION: Lemon oil is photosensitive, meaning it can react to sunlight or UV rays.  When using lemon oil on the skin, wait a few hours before exposing skin to UV rays.

After exfoliating my hands with this just once today, I can't stop smelling them and marveling at how soft they feel!  I also used it on my lips to exfoliate them and they are feeling super soft.  And I may or may not have tasted the scrub while rubbing it on my lips . . . YUM.  I'll seriously have to use self-control to not just lick it off completely every time I use it!

And, if you're looking for a sugar scrub that will help you relax, calm your mood, and even help you to sleep better, try this same recipe, but use Lavender Oil instead of Lemon Oil!  Or, try Peppermint Oil for a great pick-me-up and to help soothe achy muscles!  You can get Lavender or Peppermint Oil here.

Tuesday, February 18, 2014

Marshmallow Snowmen


This simple craft is nothing new, but it's fun!  And easy!  And quick!  And simple!  Did I mention that already???  I like simple kids crafts that we can whip out quickly and that my kids will enjoy making and playing with.  And the easy thing about this craft is that you most likely already have the supplies in your pantry!  Plus, it's an extra special treat for your kids to be able to sneak bites of the supplies as you go :)

All you need are marshmallows (we happened to have a bag of the super jumbo ones on hand), 4 toothpicks, chocolate chips for the eyes, and either candy corn or slivers of carrots for the nose.

To make your own snowman, simply stack two marshmallows on top of each other and stick a toothpick through them so they're connected.  Then, place another marshmallow on top of the two, connecting it to the others with another toothpick.  Once that's done, stick your remaining two toothpicks in the sides for the arms, and wedge your chocolate chips and candy corn into the face (you may need to pinch a little mallow out to make holes for the eyes and nose to fit nicely)!  And you're done--and now you've got a cute little marshmallow snowman or two or three, and a happy kid!


Thursday, February 13, 2014

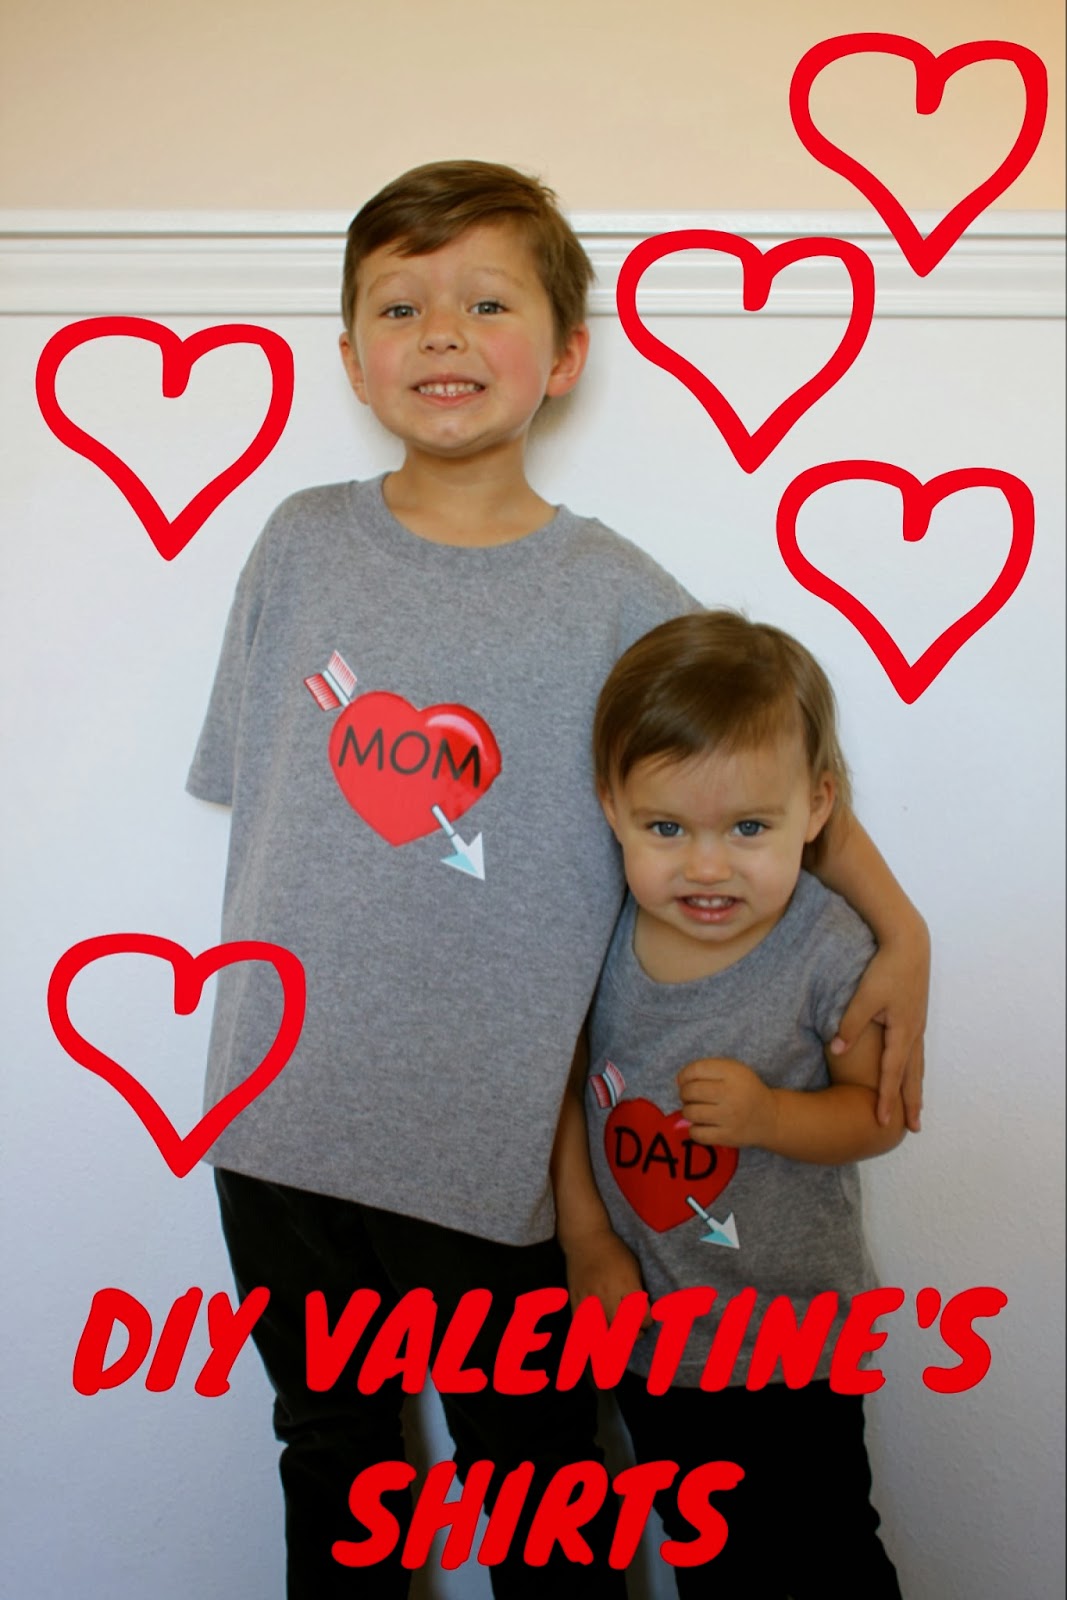
I {Heart} Mom and Dad Shirts!


I've had an idea to make my kiddies some Valentine's shirts for a few weeks now, but of course I put it off!  Luckily, this project is so simple, fast, and easy that I was able to get them done while Will was at preschool this morning, and just in time for Valentine's Day tomorrow!  So, if you want to make one, don't fret, you can get it done in practically no time at all!!!

So, here they are: I {heart} Mom and Dad t-shirts!  A little narcissistic on my part?  Maybe, but they look so cute, and it just makes my heart sing to see them wearing them that I can't help it!  Of course, you could create an image saying whatever you'd like, in case you're not as narcissistic as I am :)

Want to make one too?  They're super easy.  You just need a plain t-shirt; this morning I ran to Joann's to grab a couple of plain grey t-shirts (so, obviously, if you have shirts on hand that you can use, this project would be even quicker and cheaper!).  Joann's sells tees for about $4.50, plus I had a couple of coupons, making it so each shirt was only a couple of dollars each.  The only kicker was that Will's shirt (youth size small) was the smallest they carried, so I had to buy Clara's in that size and do some quick resizing with my sewing machine when I got home.  No big deal, but you could definitely save yourself the hassle by just going to Target and getting the right size in the first place!  Anyway . . . I'm kind of digressing here.  You will also need some iron-on t-shirt transfer papers (pictured below--I got mine from Target a while back for Will's Paw Patrol birthday party), a computer, scissors, and an iron.


Here are the simple steps:

1.  Pick out an image online, or create your own image.  I just found a simple heart and arrow image and then added the words "mom" and "dad" to them.  

2.  Print out your image onto your iron-on transfer paper according to the directions on the package.

3.  Cut the image out and peel off the protective backing from the back of your image.  

4.  Iron the image onto the front of your t-shirt according to the instructions on the package.  *I also recommend putting a rag between the image and your iron to keep the image from sticking to your hot iron!*

5.  Admire your cute kiddies expressing their love for you on the front of their clothes for all to see!!!  


Trying to give thumbs up :)


Sending love and hearts your way this Valentine's Day!


Monday, February 10, 2014

Stained Glass Paper Valentine Hearts


I have a fun and easy Valentine's Day project for you today: easy, kid-craftable stained glass hearts!  This is such a fun project, and can really be used any time throughout the year for a fun craft or to make holiday decorations.

I think these turn out better with the more color you put into them, but William was determined to make spiderman's web on one and Wall-E on the other (his Wall-E and spiderman obsession continues).  And, since this project was really just about having fun with him, we went with it . . . I also like his heart shape the best as well :)

Here's how to make your very own stained glass decoration . . .


1.  Draw a picture on plain white paper with crayons.  (The darker you color with the crayons, the better it will look.)

2.  After you're done coloring, brush vegetable oil over the entire picture so that it's completely covered.


3.  While the picture is drying, wipe off any excess oil.


4.  Punch a hole at the top of your decoration and tie yarn or string through it so that you can hang it in front of a window.  Or . . . just tape it directly to the window and let the light shine through!


This was fun and Will loves to see his hearts hanging from the window, but I'm excited to give this stained glass paper craft a try next time!

I linked up to Make It and Love It's link party!  Click here to see it on Make It and Love It.

Wednesday, February 5, 2014

Surgeon's Cap Sewing Project


A few months ago, my husband was in the OR rotation of his pediatric dentistry residency, and he came home asking me if I could make him a simple surgeon's cap so that he wouldn't have to wear the boring, disposable caps that the hospital supplies.  So . . . we did the obvious and went to a local army surplus store to buy an old BDU (aka military fatigues) jacket that we could cut up for the fabric!  Okay, okay.  Not such an obvious step here, but we figured the sturdier fabric would help the cap keep a good shape, and we had a feeling there wouldn't be as many cool fabric options for him at our local Joann's.  Anyway . . . we got our fabric and then began looking for patterns to make his cap.

The pattern we finally decided upon (it also would have been easy to deconstruct a disposable cap and use its pieces as pattern pieces, but we didn't have one at the time) is this one from craftster.org. The only change I made to the pattern was that I made the band that goes around his head 3 1/2 inches wide rather than 4 1/2 inches, just because it was too wide and hanging down to his eyes and over his ears.  So, if you're using this pattern, just fit the cap to your head before you sew your binding on at the end.  Otherwise, the pattern turned out great!

And about these pictures . . . Peter wasn't too thrilled about being my model so I made him put it on while he was making a dessert with Will tonight.  I did get him to smile for one though!  Then I put it on and then I figured I'd just make the teddy bear be the model because it was a lot easier :)


Friday, January 31, 2014

Sharpie Tie Dyed Onesies


In preparation for baby #3, I thought I would include William on a fun little craft: sharpie marker tie dying.  Not totally necessary for a new baby :)  But it's something that I've been wanting to try for some time now.  Plus, I thought it would be fun for Will to make and to have something to give his baby brother when he's born.

It was easy to do and fun for Will to draw on the onesies and to drop little droplets of alcohol onto his designs.  I do have to say though, that I'm not sure how pretty sharpie tie dying can ever be!  Maybe someone with years of experience and far superior artistic skills could make it look really cool, but for a fun crafting afternoon, I was happy with our results :)

The steps are quite simple:

1.  Gather your supplies.
- Baby Onesie or Fabric of Choice
- Sharpie Markers
- Rubbing Alcohol (at least 70%)
- An eye dropper, squeeze bottle, or children's medicine dropper
- Cardboard, magazine, or a plastic bag to place beneath the fabric


2.  Draw your design onto your onesie/fabric of choice.  Be sure to first put your cardboard between the two layers of fabric so that the ink won't bleed through.  When drawing, be sure to leave white space around your designs so the ink will have space to bleed.  Also beware of the colors that will bleed into one another so that you will be left with pleasing colors.


3.  Fill the dropper with alcohol and drop the alcohol onto your drawings.  The more alcohol, the more bleeding.


4.  Let the alcohol dry completely and then set the ink with either an iron or in the dryer.  Wait another 24 hours before washing your fabric.


Will wanted to draw a Spiderman design on his (of course!).  I think his drawing is supposed to be some sort of web :)  I actually think it looks pretty awesome.  I tried the lines design, and was pleasantly surprised by the natural circle that resulted from the bleeding.  And lastly, my attempt at making a cool little top, that even has a little sneak preview of what baby boy's name will be! Okay, little man, we're ready for you to come and we hope you'll love your custom-made onesies!